Creating Models in Quake 4
This document will attempt to explain the process that the artists and modelers of Raven Software used to create their world models, creatures and characters for Quake4. It begins at the concept stage, on through to creating the high and low poly models, creating the UVs, setting up the shaders, rendering out the normal, and then painting the diffuse, specular, and height maps to create a finished skin. While this document is focused on creating a creature, the model you make could be anything in your imagination. We have tried to simplify some of the directions and descriptions for those inspired individuals that don’t have a lot of experience creating assets for a game.
Concept Drawing:
Try to think ahead when creating your concept drawing of your character for Quake4. There are some technical limits to the Doom3 engine and you need to take those limits into account when modeling and painting your character. At the concept stage, it is smart to try and incorporate fixes to those limits into your design. Tubes and hoses that hang off or stick out from the character may look great, but they not only cause occasional modeling headaches, but might also increase your poly count on your lo-poly model unnecessarily. Those hanging or jutting tubes may also throw too many shadow volumes in the engine which could drop the frame-rate of the game dramatically. They will also require the rigger/animator to create a skeleton for them that he or she will then need to animate to add realism. When drawing up your ultimate character design try to take into account poly limits or lighting issues that your creation may unwittingly create.
With the Strogg Grunt we created for Quake4, the concept artist originally created a creature with four arms, two smaller ones along with the two large ones, and had drawn pipes and hoses jutting out from its forearms and going into its back. To lessen the possible issues the original design would have created, the artist removed the jutting hoses on a revised concept drawing that the modeler used to create his model of the Grunt. The two smaller arms were eventually removed from the design at a later date. See examples below…
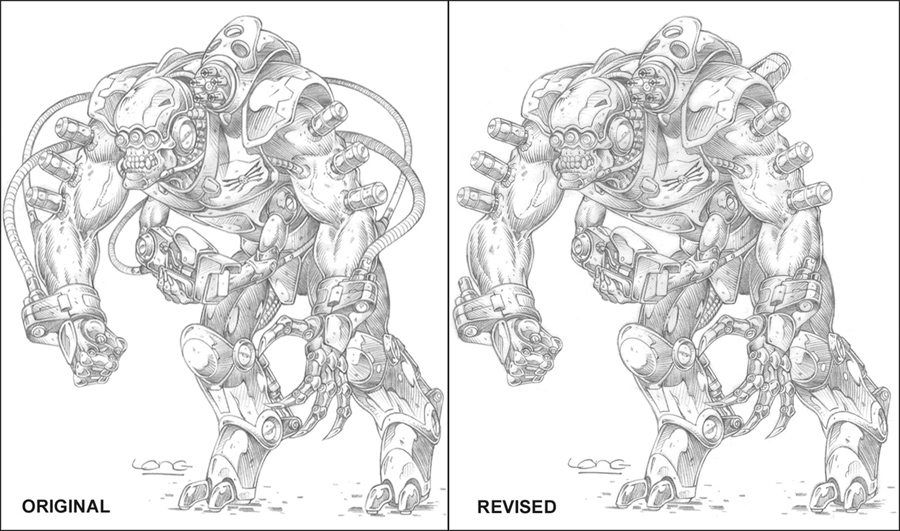
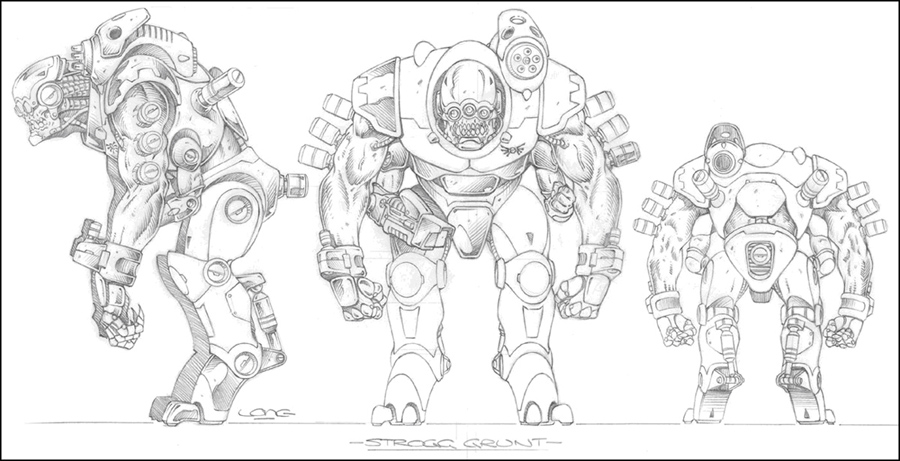
The concept artist also created a Front, Back, Side-View drawing to help the modeler visualize what the creature looked like from all angles and to simplify the modeler’s job. See the Strogg Grunt’s Front/Back/Side-View drawing below…
Modeling Your Character:
After coming up with a viable concept design for your character, you’ll want to model it using one of the many 3D modeling packages out there. Our hi-poly modelers used Maya and Lightwave to do all of their high poly modeling for Quake4. You can use most any modeling software, but in the end, we used Maya and Lightwave because we wanted to follow the same tool path that our friends down at Id Software used for Doom3. We chose to go with that tool set because we were using their revolutionary new engine and if we had any problems or questions concerning the process it would be easier for them to help us.
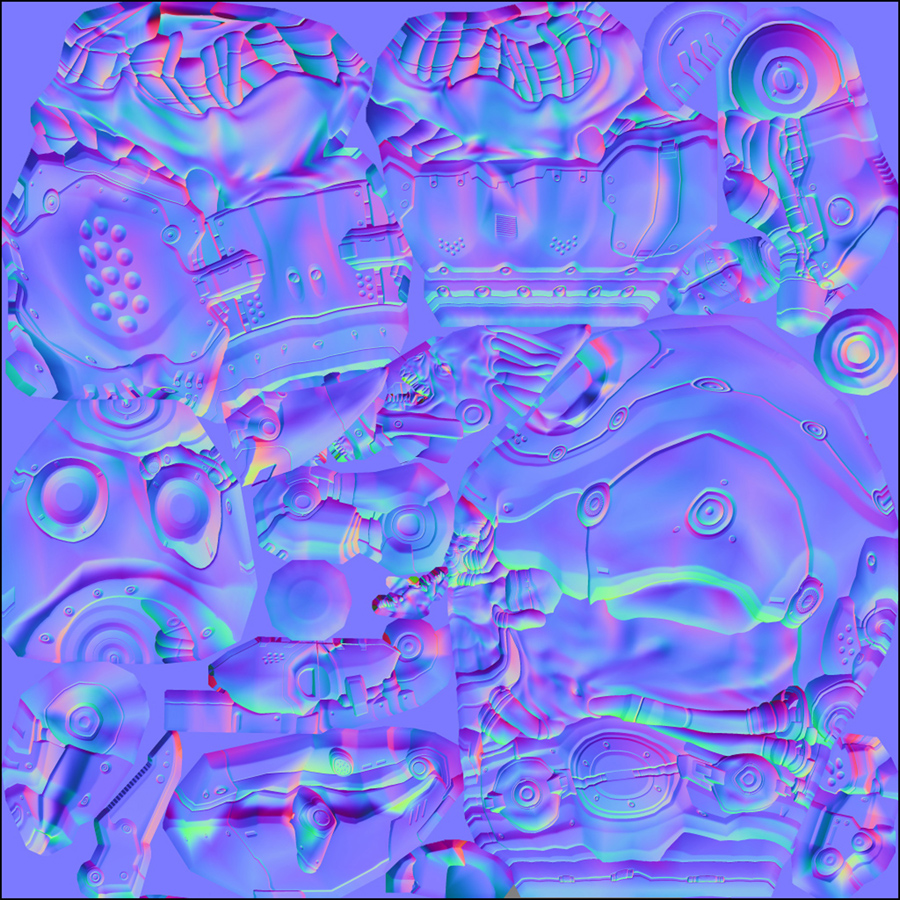
You are going to need to model your character in both high poly and in low poly. For the low poly, our creatures ranged from 500 polys on some of the lower range creatures on up to 5000 to 6000 polys for some of the bosses. The high poly models ranged anywhere from a few thousand polys on up to millions of polys. The high poly model does not go into the final game. It is used to render out a normal map that makes the low poly model that does go into the game look like a higher poly model. The reason the high poly model does not go into the game is because there are far too many polys in the model for the engine to run smoothly without chugging, etc. The low poly with its normal map is much cheaper memory-wise and makes the low poly look like it’s much higher in poly count when it’s not. Going with this process allows the game to run at a much higher frame-rate.
Some tips to take into consideration when modeling your high and low poly models:
High and low poly model positioning: Try to have the high poly and low poly models conform as closely as possible to each other to obtain the best possible render. Both the high and low poly models must occupy the same space and be lined up with each other in order to get a precise render.
“T” pose your creature or character model: When modeling your creature or character, place them into the classic T pose configuration, not in a cool looking action pose, etc. The T pose will allow you to copy and paste similar parts (arms, legs, equipment) from one side to the other, help out when ripping your UVs, and also help the animator when he is rigging and point-weighting your model. Pose the wrists and hands palm forward to help with awkward poses in-game like holding weapons, using GUIs, etc.
Add enough polys to joint areas to help in animating your model: Make sure you add enough polys to wrists, elbows, shoulders, knee, and ankle joints to allow your creature or character to move properly and look realistic when animated.
Tripling your model before rendering: Make sure both your high poly and low poly models are tripled and that there are no 1, 2, or 4 poly or non-planer polys on your model. If you do not triple and remove the offending 1, 2, or 4 poly or non-planer polys, your model will not load when you try to render it out.
Closing off the mesh: Close off open areas on the high poly that open to the inside of the model to prevent the renderer from trying to go inside while rendering out your normal map.
Trying to prevent overdraw during rendering: While modeling your high poly model, try to prevent creating areas where the render trace will create overdraw while rendering out your normal map. These would be areas where the renderer will inadvertently trace into or over another section of the model where it doesn’t belong because the area the render is trying to access is too close to another or there is an opening that goes into and behind another. You can try alleviating your problem by adjusting the trace height in the shader and rerendering or you might need to turn off the path (see the Shader and Path section below) on one part of the model and rerender the other separately from the rest of the model. You can also tear apart your high poly model into separate pieces and render out those sections separately. There is also a set-up in the shaders that allows you to number sections of your model and have the renderer render out the model piece by piece in numerical order (see the Shader and Path section below).
Conform the low poly model to the high poly model: Try to keep equipment and parts that stick out from the main mesh at a minimum. Preventing difficult rendering problems on your model will cut down on the amount of adjustment you’ll need to do in your renders, on the normal map, etc. If something is built out on the high poly, like a knob or a controller, it’s probably a good idea to also build it out on the low poly model since it may look odd and warped if viewed from the side. Poly count may not always permit you to do this, though. Extra polys can cause unwanted frame-rate issues, etc. It may not look as nice with less polys, but sometimes you have to sacrifice an awesome looking model with everything noodled out for the sake of game-play.
Right angles on corners: If the high poly model is using right angles then use them on the low poly. If the high poly isn’t using right angles on the corner, don’t use them on the low poly. Either way causes some warping. Sometimes this can’t be avoided because of poly counts.
Varying heights on a flat plane on the high poly: Try to avoid building various surfaces on a high poly using right angles. It will look like a flat plane when it is rendered by itself. This is especially true when creating level textures, but also wise to take into account when creating creatures and characters. There are a couple things you can do to avoid this:
- Build the differing heights using angles or curved corners instead of 90 degree angles.
- Build the lo-poly to compensate for or closely match the high poly.
The problem with cylinders: There will always be warping in cylindrical shapes between the low and high poly models. You really can’t spend the additional polys on the low poly model to make the rendering perfect since it would be a huge hit on the game, but you can minimize the warping by following the guidelines below.
- To lessen the warping (there will inevitably be some no matter what) you will need to spend extra polys on cylindrical-shaped models for rendering purposes. Otherwise there’s going to be noticeably warped when rendered out.
- The amount of polys that need to be added can be determined by how close the model is going to be viewed by the player. The further away the model is viewed, the less warping that will be noticeable to the player. So…if the model is going to be viewed from across the room it’s less important to spend the polys on the curve. If the model is going to be in the players face it may be a good idea to up the poly count on the model to lessen the warping.
Examples:
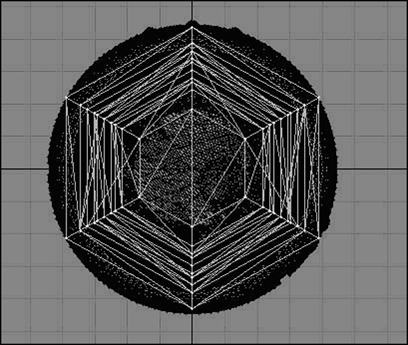
Bad! The white represents the low poly model and the black is the high. The number of sides (6) on the low poly model is too low compared to the very nicely rounded high poly model to get a nice render without lots of warping at the edges of the cylinder. From a distance it will look fine, but up close there will be very noticeable warping.
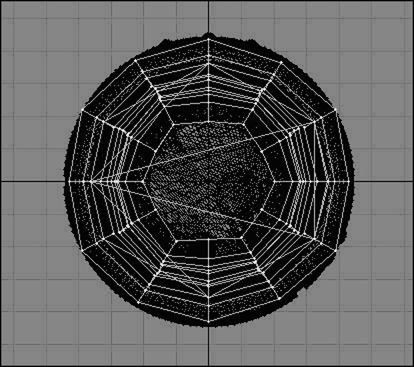
OK! The low is white the high is black. This version would yield much better rendering results with much less warping. Why? The number of sides (12) on the low poly model more closely matches the roundness of the high poly model and will yield a much cleaner render with less warping. The model will look better up close or at a distance.
The hard part is determining the number of polys you want to spend on the cylinder. Putting more into the low poly cylinder means you may have to put less into other areas of your model to still have the game run smoothly. Throwing unlimited amounts of polys into your model is not the answer.
Copy and paste parts from other models: Steal and copy parts from other models to lessen your modeling time. Taking bolts, screws, pipes, hoses, lights, small housings, etc from another model, copying them, and using them on your model will make the job that much easier. We created model parts directories of reusable pieces and parts that we could copy and place onto our models. We have included some of those model part directories for you to access. INCLUDE LINK HERE
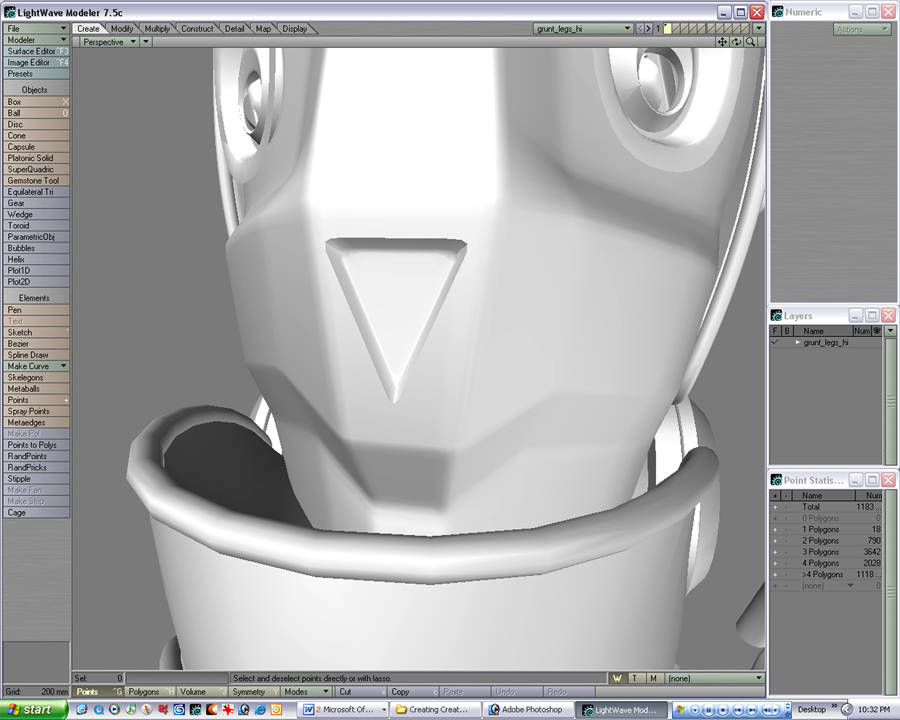
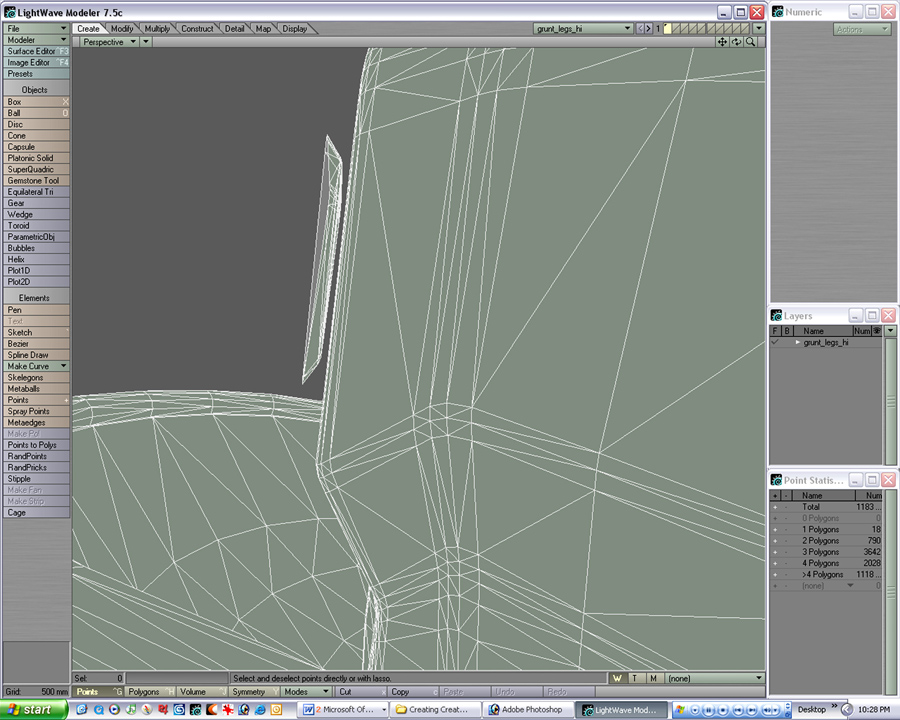
Floating parts and pieces: Due to the rendering process of Doom3, the modeler can “float” pieces above one another by a couple of microns instead having them pushed into or integrated into the mesh. Also, since the hi-poly model is only used as a base to create the normal map from, pieces and parts can just be pushed into themselves instead of having them cleanly melded. See below:
This is a screenshot of the knee and thigh section of the Strogg Grunt high poly model used to render out the normal map. The triangular indent above his knee looks like it’s integrated right into the thigh mesh, but it’s not. It’s floating above the thigh mesh.
The second screenshot below shows a wireframe shot of the same triangular indent as the above screenshot, but from the side. Notice that the triangular indent is actually floating above the main thigh mesh. It’s not indented into the thigh and it doesn’t need to be for the renderer to think it is. This makes modeling your high poly so much easier and also lessens the number of polys needed for the high poly.
Ripping, Shaders and Paths, and Rendering Out Your Model
After you have finished modeling your creature, you’ll need to rip your lo-poly model to create your UV coordinates for your model’s skin. You’ll need to use some kind of UV creation software, like U-View, to create your model’s UVs. Most modeling packages come with the tools necessary to create UVs. Some are pretty basic, others are pretty good. Some come with only the ability to create quick atlas UVs, where the software lays out the UVs in a haphazard conglomeration with no thought to seams, ease of painting, etc. Maya’s UV tools are really quite nice and allow manipulation by the artist in creating their UVs. Lightwave’s built-in UV creation tools aren’t the best, but as far as rendering goes, Lightwave is great. There are also sites online that provide user-created plug-ins for several different software packages that will allow you to manipulate your UVs even more. At Raven, one of our tool guys created a really great proprietary UV tool for us artists to use in Lightwave.
Things to check for before beginning your UV coordinates:
Make sure both the high and low poly models are tripled.
- Make sure both the lo-poly and hi-poly models share the same origin space since the texture coordinates on the lo-poly will use the hi-poly as a glorified bump-map. If they don’t line them up the normal map could be distorted or misaligned when rendered.
Cutting your model into sections for ripping & rendering: The high poly model may require you to break it up into smaller groupings or sections to overcome possible distortion or over-draw problems during the rendering process. This can be very time-consuming, but is worth it when you get a nice, clean render. You may need to do this on both the hi-poly and lo-poly models.
How to rip a model: Although every UV coordinate creator is different, here are several basic tips that will help you to create the best UVs possible.
- Try to place seams in inconspicuous places that aren’t easily seen. Place then on the inside of the arms and legs, down the sides of the torso, etc. This way they’ll not be as noticeable to the player and will make your model’s skin look even better.
When ripping difficult parts, like arms, hands, and legs, take them apart in strips, like peeling a banana, and then knit them back together when they are flattened and weld them back together. IMPORTANT! Make sure you weld the correct points to their corresponding sister point. Otherwise, you’ll end up with screwy looking UVs.
- For symmetrical parts like the arms, legs, the head, and the torso, you can delete one side of the model and just rip and flatten out one half. After ripping those pieces, you can copy and mirror them onto the other side of your model. You’ll then need to reweld the points along the central seam. Make sure the model is actually symmetrical, though.
- If you have an asymmetrical item, like a head with a piece of machinery on one side only or a face that has a scar over only one eye, you can do more of a global rip and flatten out the entire head. Have the seam run up the middle of the back of the neck and up into the top of the head. The painted hair on your skin will help cover the seam.
Make sure to set a path on your low poly model in the ripping or modeling program. This path allows the engine to be able find and access your model for the rendering process. In Lightwave, hitting “Q” will bring up the Change Surface window. In the “Name” section, type in your path. The model will be placed into the q4base directory, so the engine will look there for your low poly model. But, it is not necessary to put q4base at the beginning of the path. The engine already knows that that is where the model will be, but you’d have to include the rest of the path in order for the engine to find your model. The Strogg Grunt’s body low poly model’s path is like this: model/monsters/grunt/grunt_body2. It is not necessary to add the file extension designation (.lwo, .ma, .mb, etc) after the name of the low poly model in your path. The engine will find it without it. Every modeling and UV creation program is different and setting up the path is done differently in each. Check your software’s manual for the correct process in creating paths for your UVs.
Paths and Material Shaders:
For a full understanding of paths and shaders and how to set them up please read the Quake 4 Shaders document.
Rendering Out Your Normal Map:
Below is a step-by-step guide to rendering out your normal map. Included are how to prep your model for rendering, how to set up your shaders, and some tips and troubleshooting. This how-to occasionally refers to Lightwave, which we used as our UV creation software.
Step 1: Preliminary set up The first steps are always essential; the basics are always the first thing we overlook.
1.a Make sure your high and low poly model occupy the same space in separate files:
- Open both files into Lightwave and make sure the low and high poly meshes are occupying the same space by activating both files in the Layers window in Lightwave.
1.b Make sure your high and low poly models are tripled.
- In Lightwave, hold down (shift T) to triple your models
- While in Polygon mode, look in the polygon statistic window and make sure there are no 1, 2, or 4 poly or non-planar polys in the model. If there are, select them in this window and delete them. If you don’t delete them, your models won’t load when you try to render them out.
Step 2: Prepping UVs UV definition: UVs are sectors or coordinates that projects the shader. This is not a direct part of the mesh; it serves as a way to read the .tga files. Sometimes the UV’s may become unwelded in transfers from .obj files or Maya files.
2.a Merge your points: After you have set up your UV map, make sure the model points are merged and weld any strange points that haven’t been merged. If you don’t know how to weld points see Welding Commands pp. 26.5 or Merge and Weld Commands pp. 28.36 in the Lightwave manual (seven)
2.b Check to make sure merged points are supposed to be joined: Some of our mechanical models are pressed in and packed pretty close. Sometimes points get merged that shouldn’t be. It’s rare that this happens, but on models with moving mechanics, it might be good to check.
2.c How big is my base page: You should, at this time, determine how big of a base page .tga you need to render.
By merging points you assure a smoother normal map. If you didn’t merge your points the models would have strange seams all over it, and light wouldn’t move over the surface correctly in game.
Step 3: Setting up material shaders This is the clincher, and the thing that most people get wrong. Let’s face facts; it’s easy to mess this up, so in this stage it’s essential to be patient and not to panic.
Some definitions: Materials: the actual file format.
- Shaders: the individual entries in the material.
Here’s a typical shader for a model, and we’ll be using it as an example:
models/mapobjects/strogg/barrels_and_containers/barrels/medium1_low
{
        noselfShadow
        unsmoothedtangents

renderbump  -size 256 256 -trace .05 -aa 2 -mergehigh models/mapobjects/strogg/barrels_and_containers/barrels/barrel1_low_local.tga work/models/mapobjects/strogg/barrels_and_containers/barrels/barrel1_high.lwo

diffusemap              models/mapobjects/strogg/barrels_and_containers/barrels/medium1_low_d.tga
bumpmap addnormals ( models/mapobjects/strogg/barrels_and_containers/barrels/medium1_low_local.tga, heightmap ( models/mapobjects/strogg/barrels_and_containers/barrels/medium1_low_h.tga, 1 ) )
specularmap             models/mapobjects/strogg/barrels_and_containers/barrels/medium1_low_s.tga
}
3.a Writing the shader for renderbump: This is the key to make your render work. So what do you do? Well the safest and easiest thing to do is to copy and paste a previous entry and change the path names. Here’s the breakdown using the above example:
  The top line: models/mapobjects/strogg/barrels_and_containers/barrels/medium1_low is the Shader title: this is what the game looks for when you activate a render. Think of it as an alias or a chapter title.

  noselfShadow: This command tells the engine that the model is to generate no self shadows that might slow down the engine even more.

  unsmoothedtangents: Unsmoothed tangents are for animated models. If the model isn’t animated DO NOT use unsmoothed tangents.

  renderbump: This is the command the game looks for when you ask for a renderbump. If the shader doesn’t have this command in it, it won’t render.

  -size 256 256: This is the size that the final rendered normal will render out at. You can alter the size of the rendered out normal by decreasing or increasing the two numbers. The numbers have to be at a power of two, such as 32 X 32, 64 X 64, 128 X 128, 256 X 256, 512 X 512, or 1024 X 1024, etc. You can also set it with one number larger than the other, such as 512 X 1024.

  -trace .05: Trace is the height in which the model renders. Think of the low poly model as the surface in which the high poly is being drawn onto. If the high poly has a lot of floating geometry, you may need to render the model multiple times at different trace heights.

  -aa 2: This is an anti-alias function. If this is set to 1 it renders your UV map 1 to 1 whereas if it’s set at 2 its 2 to 1. A setting of 2 renders faster.

  -mergehigh: You need this to merge the high poly model so it will render as one model. If you don’t have this in, it will render a partial model.

  models/mapobjects/barrel/barrel1_low_local.tga: This is telling the game to write a targa named barrel1_low_local.tga to models/mapobjects/strogg/barrels_and_containers/barrels directory (remember these are path names, so each slash is a folder).

  work/models/mapobjects/strogg/barrels_and_containers/barrels/barrel1_high.lwo: This tells the game to use this high poly model to create the normal map. You can keep your high poly models in art/work. A high poly model should NEVER be on Q4base.

  Remember to open and close the shader using { and } so that the game recognizes it. See the Quake 4 Shaders document for a better explanation.
3.b Double check your path: If the path is wrong to the high poly model it won’t render. The game will not allow spaces in the path name, so use an underscore ( _ ) in place of a space.
3.c Spelling: Check your spelling and don’t forget to save
Creature, Characters, and Other Involved Model Shaders: Shaders for creatures, characters, and other involved models are much more complicated and confusing. Eventually, we built up a pretty big library of shaders and could just copy and paste ones and then change out the paths and model and skin map names as needed. We recommend doing the same…copy and paste.
Here’s an example of a creature’s shader set-up… the Makron. Creatures are much more involved than textures or simple, unanimated world models since you have to include shaders for the eyes, weapons, the clipping hull, the glow map, and the teleport fade-out.
//Makron--------------------------------------------------------------------------------

models/monsters/makron/makron_lo
{
    noselfshadow
    unsmoothedtangents
        renderbump  -size 1024 1024 -trace 0.07 -aa 2 models/monsters/makron/makron_lo_local.tga work/models/monsters/makron/makrontorso_hi.lwo

        materialImage   models/monsters/makron/makron_lo_hit.tga

        bumpMap addnormals ( models/monsters/makron/makron_lo_local.tga, heightmap ( models/monsters/makron/makron_lo_h.tga, 4 ))
        specularmap     downsize( models/monsters/makron/makron_lo_s.tga, 1 )

        {
                blend diffusemap
                map     downsize( models/monsters/makron/makron_lo_d.tga, 1 )
                alphatest .5
        }
        {
                blend add
                map downsize( models/monsters/makron/makron_lo_gl.tga, 1 )
                rgb grunttable [ time * 1.3 ]
        }

        inlineGuide corpseBurnEffect(models/monsters/makron/makron_tport.tga)
}

models/monsters/makron/makron_torso
{
    noselfshadow
    unsmoothedtangents
        renderbump  -size 1024 1024 -trace 0.07 -aa 2 models/monsters/makron/makron_lo_local.tga work/models/monsters/makron/makrontorso_hi.lwo

        materialImage   models/monsters/makron/makron_lo_hit.tga

        bumpMap addnormals ( models/monsters/makron/makron_lo_local.tga, heightmap ( models/monsters/makron/makron_lo_h.tga, 4 ))
        specularmap     downsize( models/monsters/makron/makron_lo_s.tga, 1 )

        {
                if Parm7 == 0
                blend diffusemap
                map     downsize( models/monsters/makron/makron_lo_d.tga, 1 )
                alphatest .5
        }
        {
                blend add
                map downsize( models/monsters/makron/makron_lo_gl.tga, 1 )
                rgb grunttable [ time * 1.3 ]
        }
        inlineGuide corpseBurnEffect(models/monsters/makron/makron_tport.tga)


}

models/monsters/makron/makron_torso_collision
{
        noShadows
        collision
        materialImage   models/monsters/makron/makron_lo_hit.tga
}


models/monsters/makron/makron_legs
{
    noselfshadow
    unsmoothedtangents
        renderbump  -size 1024 1024 -trace 0.07 -aa 2 models/monsters/makron/makron_lo_local.tga work/models/monsters/makron/makrontorso_hi.lwo

        materialImage   models/monsters/makron/makron_lo_hit.tga

        bumpMap addnormals ( models/monsters/makron/makron_lo_local.tga, heightmap ( models/monsters/makron/makron_lo_h.tga, 4 ))
        specularmap     downsize( models/monsters/makron/makron_lo_s.tga, 1 )

        {
                blend diffusemap
                map     downsize( models/monsters/makron/makron_lo_d.tga, 1 )
//              alphatest .5
        }
        {
                blend add
                map downsize( models/monsters/makron/makron_lo_gl.tga, 1 )
                rgb grunttable [ time * 1.3 ]
        }
        inlineGuide corpseBurnEffect(models/monsters/makron/makron_tport.tga)

}

models/monsters/makron/makron_legs_collision
{
        noShadows
        collision
        materialImage   models/monsters/makron/makron_lo_hit.tga
}

models/monsters/makron/makron_eye
{
    noselfshadow
    unsmoothedtangents
        renderbump  -size 128 128 -trace 0.05 -aa 2 models/monsters/failed_transfer/ft_eye_local.tga work/models/monsters/failed_transfer/ft_eye_hi.lwo

        materialType    flesh

        diffusemap      models/monsters/failed_transfer/ft_eye_d.tga
        bumpmap         models/monsters/failed_transfer/ft_eye_local.tga
        specularmap     models/monsters/failed_transfer/ft_eye_s.tga

        inlineGuide corpseBurnEffect(models/monsters/corpseBurnEffect_sm.tga)
}
Step 4: Setting up shaders for your model In this stage, you’ll go back into the low poly model and assign the shader you wrote to make your normal map.
4.a Open your low poly model and assign your shader name to a surface on the model: This is another key to get things to work, if you don’t have the right shader on the right model, you won’t be getting the right results. In Lightwave hit Q and a dialogue will appear. Copy the shader name from the material file and paste it into the dialogue. So in the previous example you’d open the medium.lwo barrel model and assign models/mapobjects/strogg/barrels_and_containers/barrels/medium1_low to the model.
4.b Assign attributes to the surface:
- In Lightwave open the Surface Editor.
- Select the shader name in the left column (it will highlight)
- Go to the basic tab
- Go to the color line and hit the “T” button
- The Texture editor dialog will appear
- In the middle right column there will be a pop down menu for projection, select UV
- A UVmap pop down menu will appear
- Select the Texture UV map. (Generally this will apply)
- Close the Texture editor
- Select the gray box on the color line, a color window will appear. Select a different color than gray. (this is to assure your changes were made) to close the window click the OK button
- Go to the bottom of the right column, and click the smoothing button on. For rendering put it at 180
4.c Save
You’ve now prepped the low poly model to be rendered. When you activate the low poly to be rendered, the game will load the model, and see that it has an active shader. It will then find the shader and use the renderbump line to write a targa based on the high poly model using the parameters you’ve set.
Step 5: Rendering
With Quake4 installed on your computer, open the Command Prompt on your computer (Go to Start, then All Programs, Accessories, Command Prompt).
Type in C: and hit Enter.
Type in cd <your installation directory> to change directories. This should point to where you have Quake4 installed. (C:\Program Files\id Software\Quake 4)
For Textures: Type in Quake4 +renderbumpflat [ -size <x> <y> ] < path to model > to allow the engine to find your texture model to render from.
In the “-size” section, type in the size you want your texture’s normal to be rendered out at in a power of 8. It might be a 32 X 32, 64 X 64, 128 X 128, 512 X 512, or even a 1024 X 1024. To create a texture that has an odd aspect-ratio, such as 512 X 256, just type that into the size section.
In the “path to model” section, type in the path where your texture can be found on your computer.
For Models: Type in Quake4 +renderbump [ –size <x> <y> ] [ -trace < distance > ] [ -aa < # times aa > ] [ -unweld ] [ -overlap < size > ] [ -globalmap ] [ -colormap ] [ -outline < size > ] [ -mergehigh ] [ -outline < size > ] < normal map image file > < path to model >
Hit Enter for the normal map to be run in the engine and be generated. The normal map will be rendered out to your C: Drive. Type in Quit in the console to quit out the game.
Other Tips for Rendering:
5.a Load the game and make sure you are in windows mode: If the game is full screen renderbump WILL NOT WORK.
5.b Let the renderbump render: At this point Quake 4 will start and a grey window will appear. The window will draw a normal map in the window. After it is finished rendering the normal map the window will change to an in game window and will seem to freeze. Do not interrupt the game at this time, it’s writing the targa down to your C drive and sometimes it takes time.
5.c Set up the shaders to see the model in game: At this point, you’ll need to take a look at your work. Set up temporary targas for the _d, _h, _s and put them on base with the _local in the correct directory. The renderline is not loaded into the game unless it’s called out, so leaving it there is ok. Load into ModView and see the magic. See below example:
models/mapobjects/strogg/barrels_and_containers/barrels/medium1_low
{
        noselfShadow
        unsmoothedtangents

renderbump  -size 256 256 -trace .05 -aa 2 -mergehigh models/mapobjects/strogg/barrels_and_containers/barrels/barrel1_low_local.tga work/models/mapobjects/strogg/barrels_and_containers/barrels/barrel1_high.lwo

diffusemap              models/mapobjects/strogg/barrels_and_containers/barrels/medium1_low_d.tga
bumpmap addnormals ( models/mapobjects/strogg/barrels_and_containers/barrels/medium1_low_local.tga, heightmap ( models/mapobjects/strogg/barrels_and_containers/barrels/medium1_low_h.tga, 1 ) )
specularmap             models/mapobjects/strogg/barrels_and_containers/barrels/medium1_low_s.tga
}
If all went well, you rendered out your normal map for your creature or character. In the next section, we’re going to look into tips, tricks and troubleshooting for potential problems that may occur.
Step 6: Tips and Tricks In this section, we’ll go over some tips and tools that have been added to the render code to make it easier to render complex geometry.
6.a Avoid overdraw: Overdraw is our bane on animated pieces. The best thing to do is have the modeler build the model and separate it into sections. Then write some shaders that point to the different pieces and render it that way. Try to set up your low poly and highlight pieces that aren’t touching each other as a shader name and the rest as of the model with a default surface. Mirror the low poly selections in a high poly file and write a shader to the new high poly pieces. Assign the shader to the low and render the file. It will only render what’s highlighted. Then render the others until you’re done. Assemble the Local map using the channels and layers then you have your local. Save it down as a targa. Remember to change the name of the local map in the render line EVERY TIME you render different sections from the same model, otherwise you’ll copy over your work and be angry.
6.b Assembling the local map: When you have multiple local maps and you need to assemble them into one map use the channels in each file, invert the selection and give yourself a three pixel expand so you have some bleed on the local. Invert the selection and shift drag it into another file. It should snap to the edge. A different way of doing it is after you enlarge the selection and reinvert the file you can fill the negative selection with a sampled 50% gray. Deselect the file and drag the file over to a base file. Assign the layer with overlay and all of the gray will drop out.
6.c Rendering takes time and patience: For higher poly models, like creatures or characters that are in the millions of polys range, it may take several minutes to an hour or more to render out parts. Be patient…
6.d The .1, .2. .3 system: Early on in the project, one of our programmers added some nice functionality to the rendering system. If you want to render a section of the model because of weird lighting or you may want to render out a partial model, you can add a .1 after the surface name in Lightwave. (or whatever you want to name it: Example shadername.Forehead or shadername.300 or shadername.iamcool, whatever)
Example:
In Lightwave you’d assign the following to a model in the surface parameters:

Here’s your base shader from the above example
models/mapobjects/strogg/barrels_and_containers/barrels/medium1_low

Select out a pesky bit of geometry and hit Q enter this
models/mapobjects/strogg/barrels_and_containers/barrels/medium1_low.1

While the model is rendering, it will render the top shader first and then render the .1 shader separately afterwards. All in the same render and the same file.

If you really want to get tricky, lets say only one area of the model isn’t rendering properly, and you know you need a higher trace value for one section. Instead of cutting and pasting into the local map select the geometry and add
models/mapobjects/strogg/barrels_and_containers/barrels/medium1_low.2 –trace .09

This will render that area at a higher trace. The only drawback to this is it can make for some weird lighting. The best thing to do for this is to select whole sections of geometry…select a whole side verses part of a side.
Painting on the normal: Sometimes you’ll get weird anamolies that no amount of rerendering or altering the trace height will get rid of. In those cases, the artist would paint on the normal map in Photoshop to get rid of the anamoly. Painting on the normal takes skill and a real good understanding of how the normal map works. Several of our artists definitely painted on their normals, but we recommend that the best thing to do is to either CUT and PASTE from another “clean” section of the normal or use the CLONING tool in Photoshop. You can also pull detail from other local maps, but be sure the renders are on the same planes and you cannot rotate anything you may bring into the new local map.
Step 7: Trouble shooting There will occasionally be problems that arise with the renderbumping system. Some of the problems can be solved pretty easily while others may take time to figure out. Refer to this listing when you have a problem…
IMPORTANT! If something isn’t working right wait until the render is done and look through the errors. When the render has finished look at the print-out that pops up afterwards. Nine times out of ten, if it’s a shader or a model issue it will show up there.
Problems and possible fixes:
7.a The render window pops up, but there’s no local map being drawn:This could be any number of things.
- Check the error
- Check the shader for spelling and path
- Check the low poly model’s shader surface name.
- Check to make sure you’re rendering from the correct model.
- Sometimes the model will have a surface that is actually a shader. If this happens the game gets caught in a loop and won’t render.
7.b The low or high poly model won’t load:
Check to see if model is tripled and has only tris. If any model has quads in it or anything other than tris it WILL NOT LOAD.
- The High poly model may have some surface the game doesn’t like. It’s rare that this happens, but it does occur in some of the Maya and 3D Studio MAX translated models.
7.c The render is creating weird colors in the local map:
Shards of color: This could be a couple of different things. Either you need to heighten or lower your trace height or you have some problem with overdraw. For trace height use the .1, .2 –trace .07 trick. Or re-render the local and piece the files together in Photoshop. Remember to change the local.tga name when you re-render otherwise it will overwrite the local that may be good. For overdraw you’ll have to move some pieces out of the high poly model and render them separately.
The green/purple cut: This happens in unsmoothed tangents mostly and happens quite often. It may have something to do with how unsmoothed tangents averages smaller geometry. In game, it causes a black line in the middle of the lighting. To fix this, you’ll need to re-render that area separately using the .1 method or selecting out the area and copy and pasting it into the local map.
7.d My local map has distortion: There are various reasons this can happen. The first thing to do is to create some temp textures and get them in game to see if the normal is really distorted. Sometimes the local map looks distorted but isn’t. Some distortions are from the lack of polys on the low poly model. Depending on game issues and cost you may be able to add polys to the model to alleviate the problem.
7.e I have a model in game that has lighting issues along the seams: There are only a couple ways to fix this, one is to make sure your skin is painted right, the other is to directionally weld the points to the other half of the UV map. This forces the low poly to read a certain way. Also make sure your seams match on the diffuse, height and specular. In some cases you may need to re-rip and rerender the UVs to make this problem go away. Make sure you load the model in game with a temp texture before you get into the paint stage to avoid hours of lost work, etc.
7.f UVs aren’t translating over to the .obj file: You’ll need to follow the directions in Step 4.
7.g The model won’t show up in-game or only shows up partially in-game: A couple things could be wrong. The error message will tell you a lot if you encounter this problem. It will either be that the .tga files are in the wrong place, the shader name is bad, the shader isn’t applied to the whole surface, or the d3t files are overriding the render.
Painting Your Diffuse, Specular, and Height Maps:
After you have rendered out the normal map, you can then start painting the diffuse, specular, and height maps for your creature or character. Any painting program can be used to create your skin, but we at Raven use Photoshop, as do most computer and console game studios.
Diffuse Map: The diffuse map is the color portion of your skin. It determines the colors of the creature’s flesh, paint job, decals, blood, etc. Since your creature or character is somewhat realistic looking in the game, we recommend using photo reference for your diffuse. Photo reference are digital photos of rusty metal, different types of metals, chipped paint, blood, wounds, flesh, etc that are used to create realistic looking skins. You can use a digital camera and go out and shoot lots of real asset photos to use for your diffuse map. There is still plenty of “real” painting to do on the skin, even with using photo reference.
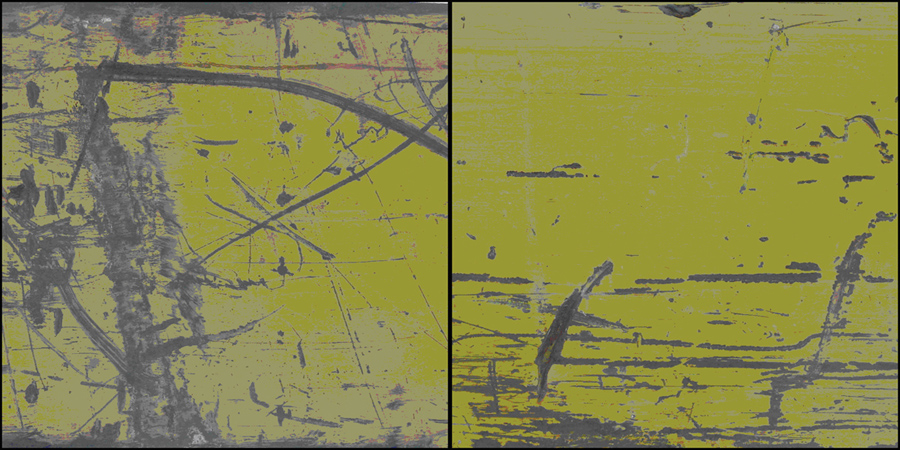
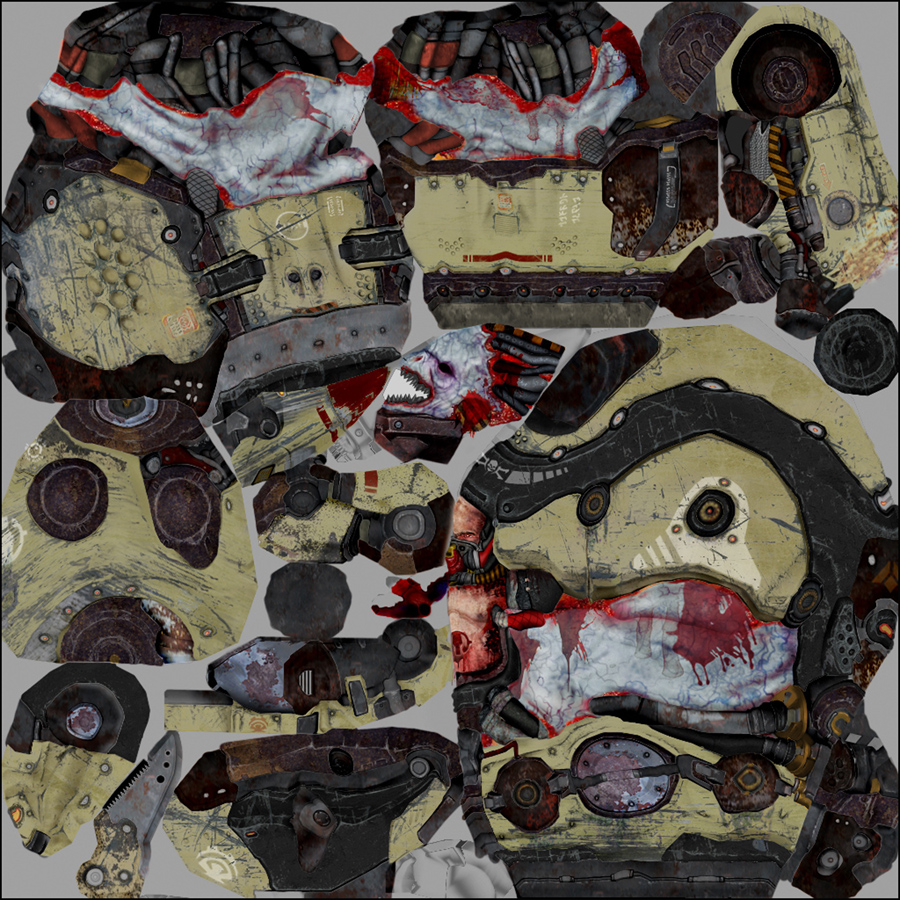
For the Makron’s diffuse map, the artist used photos of the scratched up paint on a bulldozer that he took for the painted and scratched areas of the skin. The artist altered the color slightly and adjusted and added additional scratches, dirt, and rust. He also used several different photos of differing types of metals, etc to vary up the detail on the Makron. For the Makron’s exposed flesh, he used photos of pig flesh and added in the veins, bruising, and ripped open wounds and blood. See examples of the bulldozer photo reference and the final diffuse below:
Specular Map: The specular map is used to add sheen to areas of your creature’s skin, highlights to edges, and can help determine different types of metals, chipped paint, etc. I believe the specular map is the hardest part of the skin to paint and the most time-consuming of the three maps. Do a really nice job on the specular and it’ll really make your skin sing.
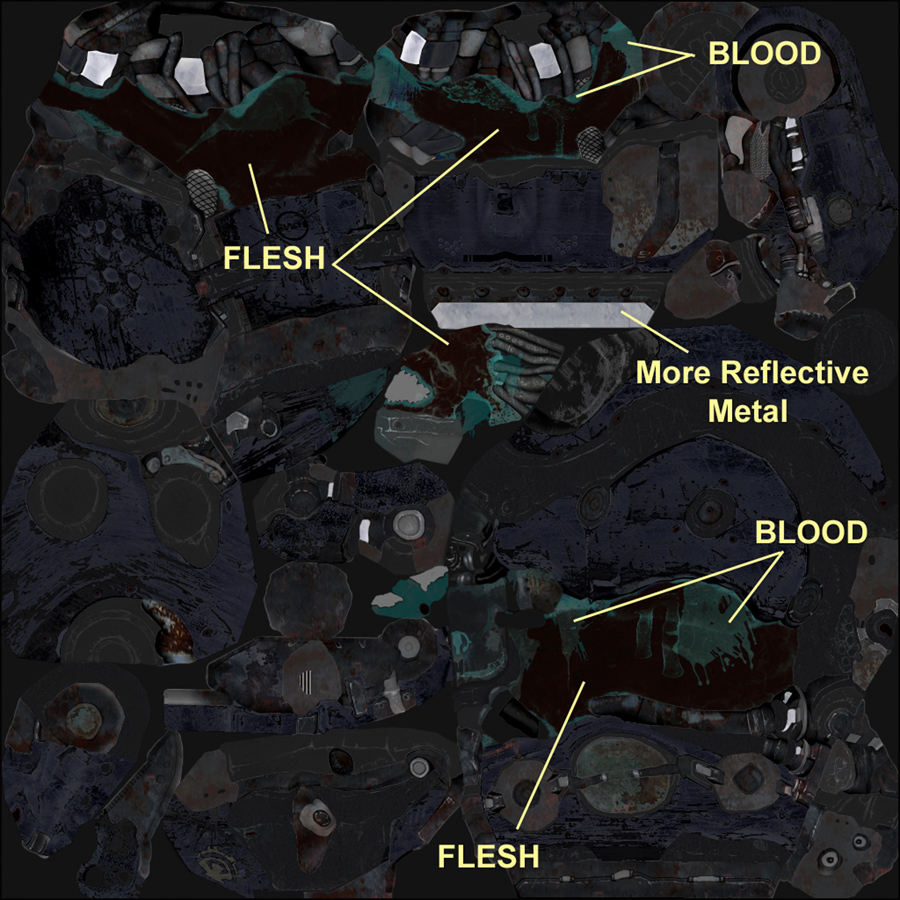
I have included a sample of the Makron’s specular map with areas of flesh, blood, metal, etc pointed out. You can use this as a basis to determine how to do your specular. Also, look at some of the other Q4 creature’s speculars to gain a better understanding and read our Specular Maps write up. It’s very basic, but informative as to how we created specular maps for Quake4.
Tips to painting nice specular maps:
- When doing flesh, rubber, and other not too reflective surfaces make those areas on your specular map the darkest areas in relation to the other more reflective parts. Flesh and rubber don’t usually reflect a lot of light and therefore would be darker on your specular than some shiny metal, etc.
- You can define chrome, stainless steel, and other very reflective metals by upping the highlights or brightness on those areas of the specular.
- Adding little “hotspots” of light to highlighted edges can really help sell the realism of your skin.
- Make painted areas slightly less reflective than the metal underneath. If the metal showing though the chipped areas is a tad brighter than the painted parts, the skin will look more realistic.
- On cylinders and other rounded areas on your skin, adding a highlighted section or horizon line will make that area read much more realistically as the light rolls across/over it.
- You can add percentages of color to your specular map to intensify particular colors on your creature’s or character’s skin. A good example would be the Nexus Protector (Stream Protector). His body’s paint job is white, but has a greenish pallor to it. Making his specular map a purplish color created a pearlescent white color to his skin.
- Creating realistic looking blood on your specular: On your diffuse, paint your blood the normal reddish color on a layer, and then for your specular map slide a copy of the blood over and invert it. In Photoshop, hit Image, then Adjustments, then Invert. That will invert the color information of your blood. After being inverted, the blood will be blue green in color. You can adjust the brightness and intensity and flatten it onto your specular map. Once that is in place and saved out, the blood will look so much more realistic and wet. See example above.
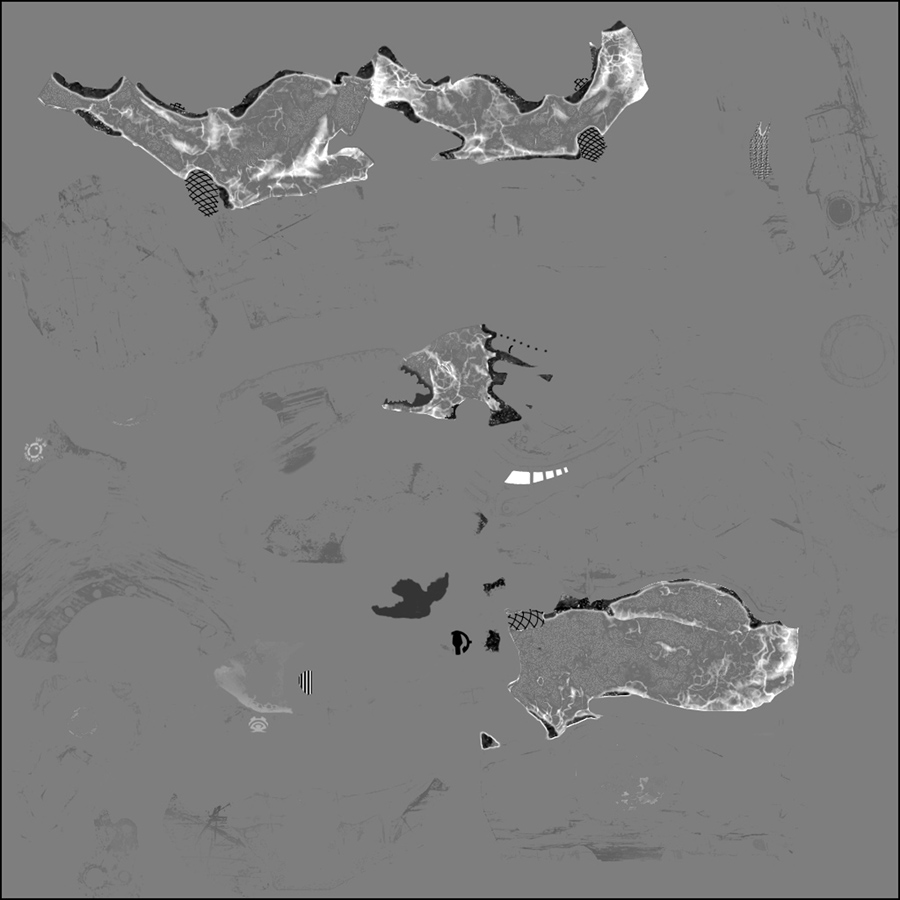
Height Map: The height map compliments the normal map. It is used to add dings, dents, scratches, indented wounds to flesh, etc. It is just a grey-scaled image. The way the height map works is that white equates to height and black equals depth. By varying the intensities of white and black, it creates differing height and depth information to the height map. The brighter or more intense the white, the greater the height indicated on your height map. The darker or more intense the black, the deeper the depth on your height map. The height map can only indicate height and depth on a 90 degree up and down angle. It can’t indicate angled information like the normal map can.
Tips to doing height maps correctly:
DO NOT just grayscale the normal map and invert it to create your height map! Doing so will only cause the height map to fight the light vectoring information of the normal and nullify its effectiveness.
- Start out your height map out with a 50% gray as its base background color. Consider 50% gray as being totally flat and anything lighter in value as being raised above it and anything darker than 50% as being lower or beneath it.
- Avoid adding tons of noise to create height. Too much noise will only muddy your height and normal maps and destroy the effectiveness of both.
- The height map doesn’t need to be overly detailed or very busy looking to do its job. It is meant to compliment the normal, not override it. If you look at the Makron’s height map, you’ll notice that it’s pretty simple. All that are on it are indications of scratches in the paint job of the Makron’s metal body parts and the flesh areas with the wounds. Notice that the veins and wrinkles on the flesh are raised with pretty intense white and that the wounds are pushed in with some very dark grays. The scratches in the metal parts of the Makron’s body are a very light gray color since paint is usually only microns thick and the scratches wouldn’t be very deep when the paint is on top of metal.
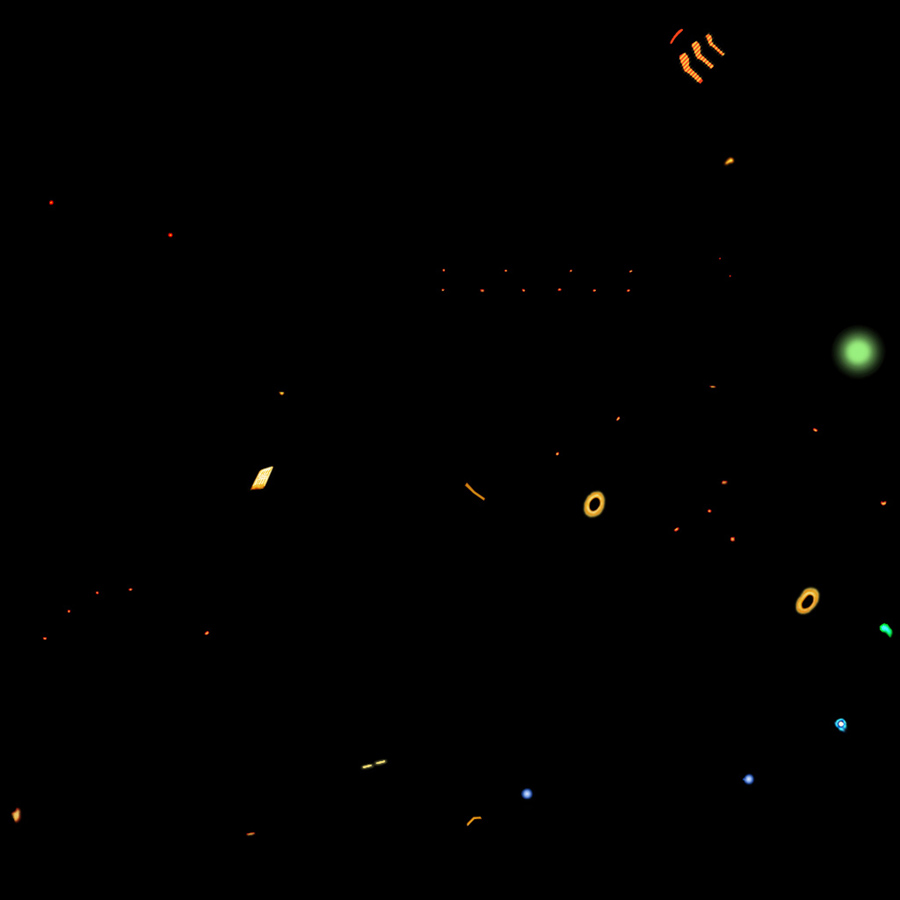
Glow Map: The glow map indicates areas on the skin that glow or look like lights. The glow map usually has a 100% black as its base background and snippets of color that indicate the lights, etc. Through the shader, you can have the glow map flicker, etc. As an example, we have provided the Makron’s glow map below. On some of the glow maps we created for Quake4, you’ll notice that some of the lights are painted to look like headlight-like lamps. Indicating the little lines and boxes that you see in a headlamp, make your lights look a lot more realistic. You get a better understanding, go out and look at your car’s headlights or find a picture of some and look at how the glass covering is etched to refract and concentrate the light emitted from the bulb.
Hit Map: The hit map indicates to the engine what kind of material parts of your creature or character are made of, such as solid metal, hollow metal, rubber, etc. Effects are also tied to it and fire when that particular area is shot. Flesh will squirt blood when shot. Metal will emit sparks when shot. Concrete will spout puffs of dust and pebbles. We created a material detection system based on the RGB setting numbers of particular colors. We have included our material detection color guide and an example of the Makron’s hit map below. Since pixel density isn’t as important on the hit map, we usually decrease the size of it by one or two times to save on texture memory.
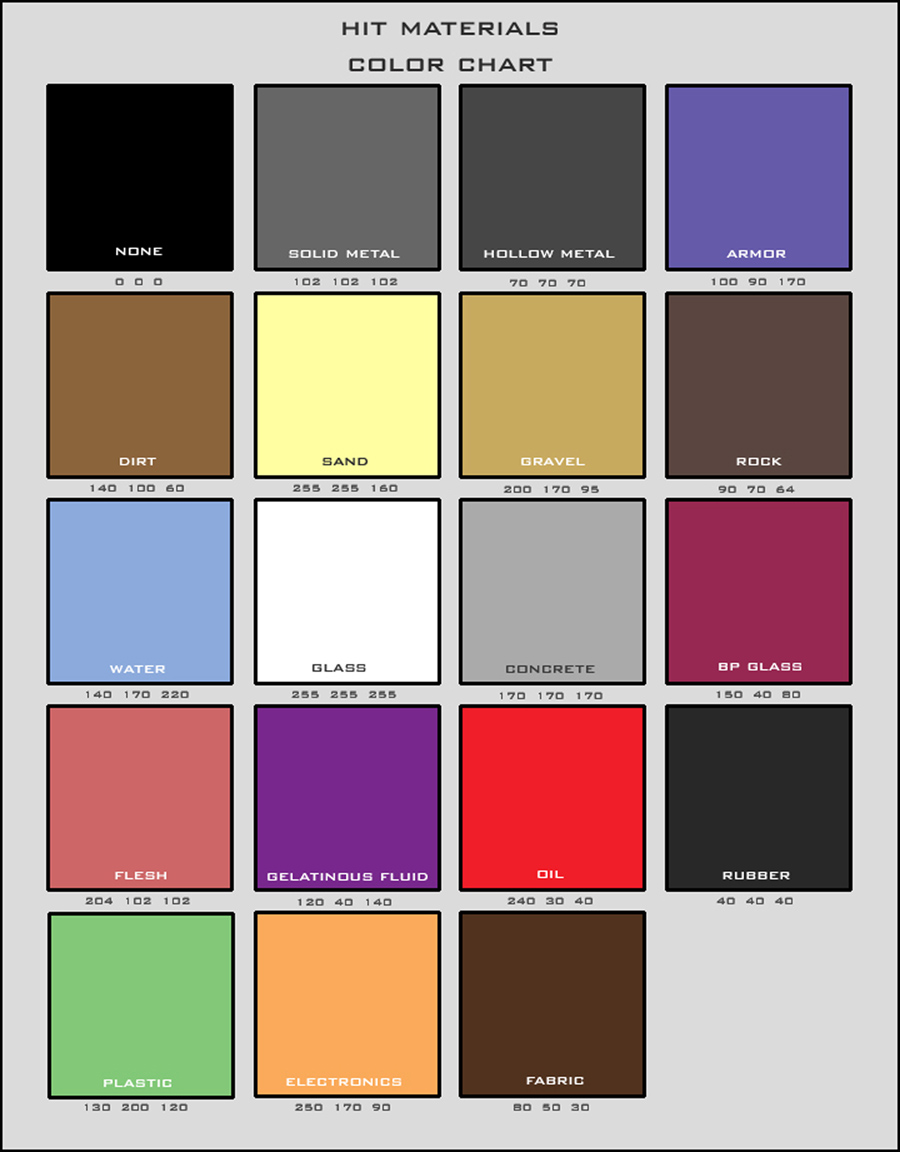
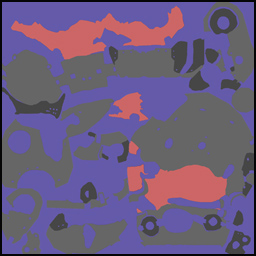
Viewing your model in ModView: The Quake4 game comes with a nifty little addition called ModView that allows you to see the skin on your model as you are painting and updating it. ModView is a model viewer. You can see your model in wireframe mode, rotate the model on all axes, update your skin, view animations on your model, change lighting, and access alternate skins and models. It’s a wonderful little tool.
