Creating A Texture For Quake4
This document will attempt to explain the process which the artists and modelers of Raven Software used to create textures for the Quake4 game. It begins at the concept stage, on through to creating the high poly models used to render out the normal, setting up the texture’s shaders, and then painting the diffuse, specular, and height maps to create a finished skin. We have tried to simplify some of the directions and descriptions for those inspired individuals that don’t have a lot of experience creating assets for a game.
Creating Your Texture Model: After concepting up a nice texture design, you’ll need to model your texture using one of the many 3D modeling packages available. Our hi-poly modelers used Maya and Lightwave to do all of their high poly modeling for Quake4. You can use most any modeling software, but in the end, we used Maya and Lightwave because we wanted to follow the same tool path that our friends down at Id Software used for Doom3.
The image below is of an actual texture model used to create a normal for Quake4. The texture was created in Lightwave and has a tripled poly count of 95284.
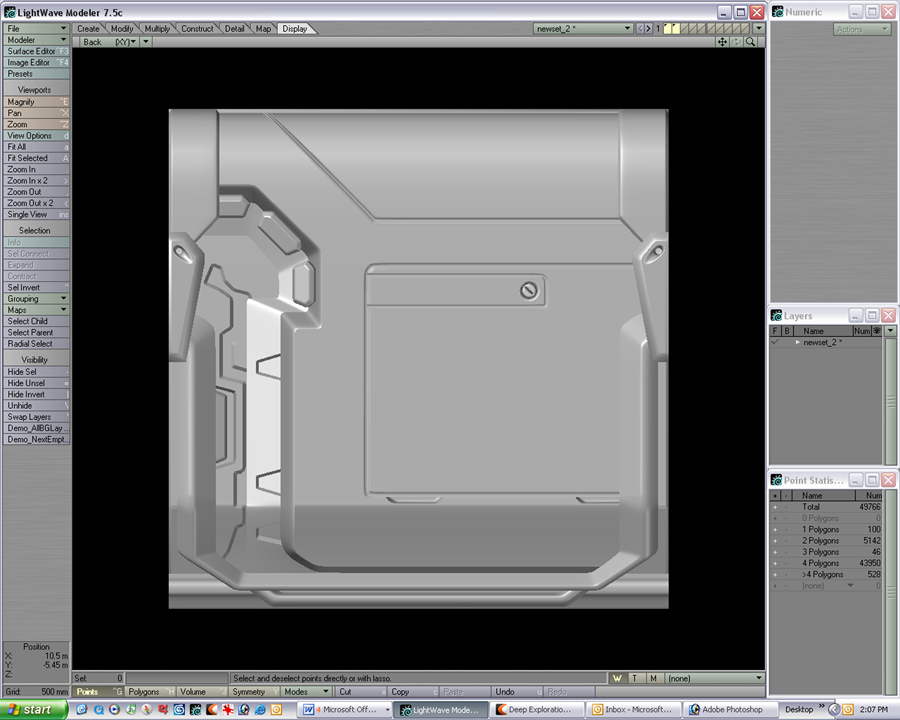
Modeling Textures for Quake: Modeling textures is slightly different than what is done for a creature or world model, there is no need for a low poly model, only the high poly one. The model never goes into the game, it is only used to render out your normal map. But don’t discard or delete your texture model, save it out on your C: drive because you can always use it to copy parts off of for other textures, etc.
Because your texture model is rendered out with the command renderbumpflat and the trace traces out at a straight-on 90 degree angle (like a scanner), you’ll need to model your texture with bevels and rounded surfaces in order for them to show up on the normal map render. Modeling your texture without bevels or rounded pieces will make your texture render out flat with no raised parts or pieces. As an example, see the texture in the image below. This is the same texture as the one in the image above, but has been turned slightly to show the bevels, rounded sections, and the fact that it is not flattened out, but with “floating” parts and pieces, like an exploded view.
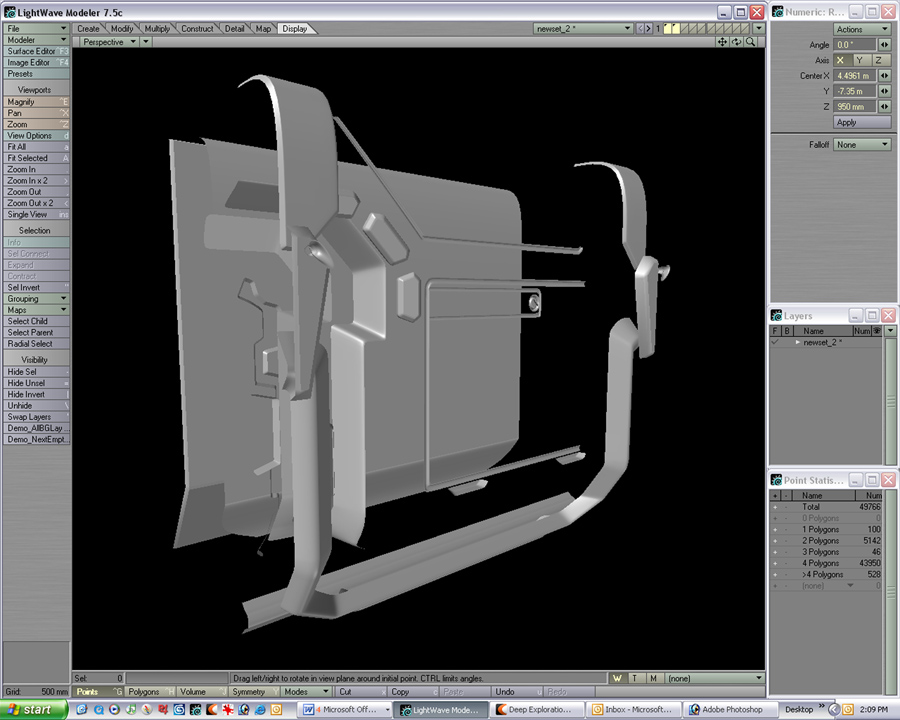
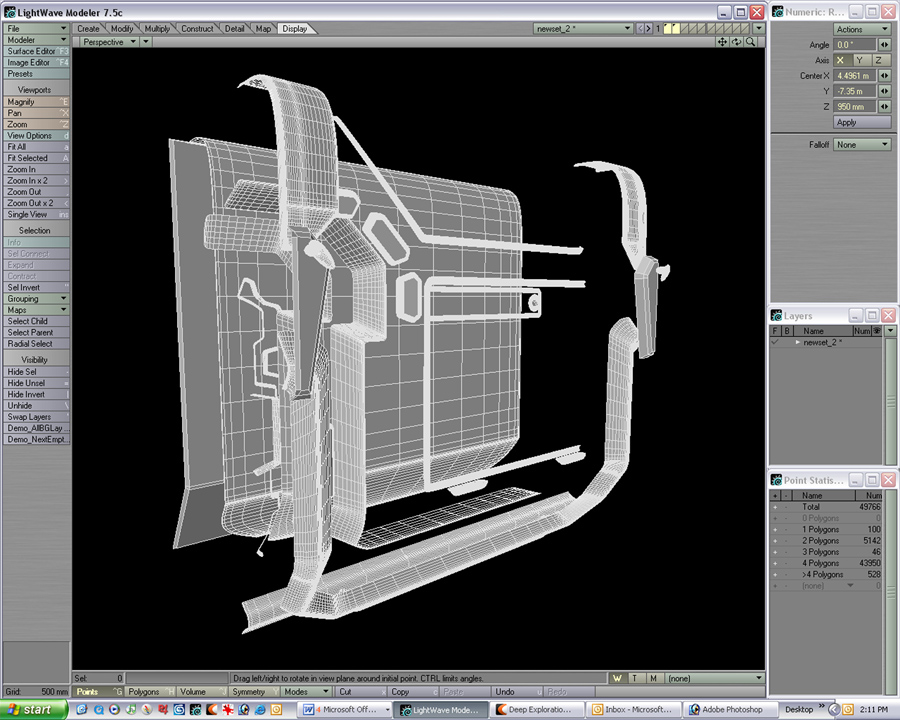
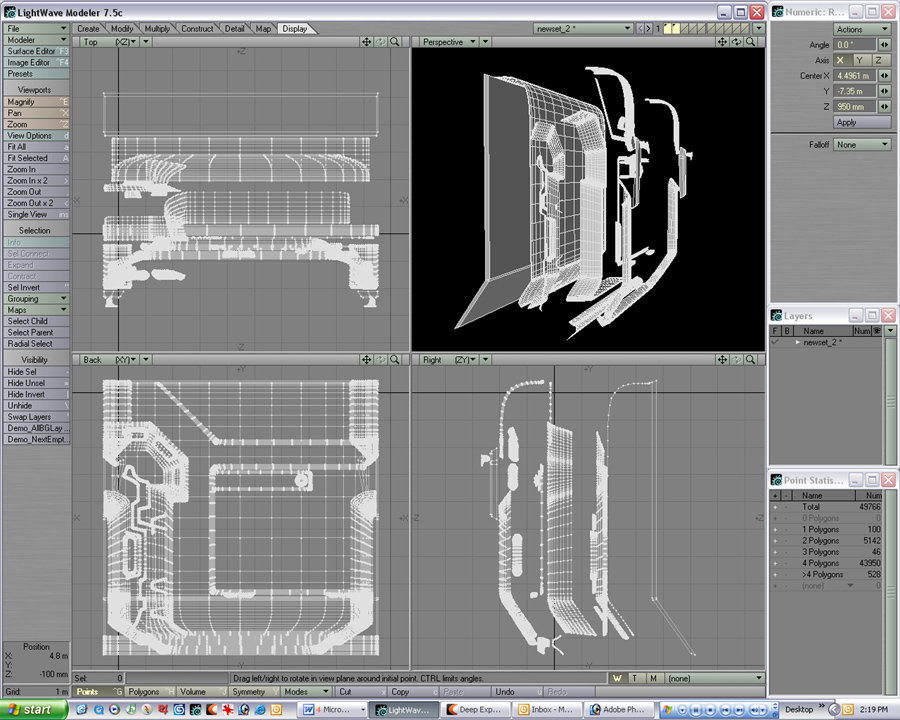
In order to render this texture out, its parts don’t need to be flattened out, butted up against each other, or even pushed the other parts. The renderer will read it as being flattened even when it’s not. Here are a couple more examples images. Notice in the top left and bottom right windows of the bottom most image that the model parts are intentionally placed in front of each other.
Texture Modeling Tips:
Beveling and Rounding: Make sure all parts are beveled or rounded to give the texture depth and mass when it is rendered.
Float Parts and Pieces: Be sure to “float” model parts and pieces. It’ll lessen the poly count on your texture and make it easier to model.
Tripling and Merging Points: Make sure you triple the model and merge your points before attempting to render out your normal map. Delete any 1, 2, or 4 poly or non-planer polys on your model. If you do not triple and remove the offending 1, 2, or 4 poly or non-planer polys, your model will not load when you try to render it out.
Save Your Texture Model: Save your texture on your C: drive so that you might copy and paste parts from it for other textures or models.
Copy and Paste Parts From Other Models: Steal and copy parts from other models to lessen your modeling time. Taking bolts, screws, pipes, hoses, lights, small housings, etc from another model, copying them, and using them on your model will make the job that much easier. We created model parts directories of reusable pieces and parts that we could copy and place onto our models. We have included some of those model part directories for you to access.
Once you have completed your model, you’ll need to render it out: Once your high poly texture model is completed, you’ll need to set up your material and render out your texture’s normal map.
Setting Up Your Texture’s Material Shader: See Section 4 of the Quake 4 Shaders document for an explanation on how to write out your shader for rendering.
Rendering Your Texture’s Normal Map: Below is an exclamation on how to render out your normal after you have set up your shaders.
With Quake4 installed on your computer, open the Command Prompt on your computer (Go to Start, then All Programs, Accessories, Command Prompt).
Type in C: and hit Enter.
Type in cd <your installation directory> to change directories. This should point to where you have Quake4 installed (C:\Program Files\id Software\Quake 4)
For Textures: Type in Quake4 +renderbumpflat [ -size <x> <y> ] < path to model > to allow the engine to find your texture model to render from.
In the “-size” section, type in the size you want your texture’s normal to be rendered out at in a power of 8. It might be a 32 X 32, 64 X 64, 128 X 128, 512 X 512, or even a 1024 X 1024. To create a texture that has an odd aspect-ratio, such as 512 X 256, just type that into the size section.
In the “path to model” section, type in the path where your texture can be found on your computer.
Hit Enter for the normal map to be run in the engine and be generated. The normal map will be rendered out to your C: Drive. Type in Quit at the console to quit out of the game.
Other Tips for Rendering:
Load the game and make sure you are in windows mode: If the game is full screen renderbump WILL NOT WORK.
Let the renderbump render: At this point Doom 3 (quake 4) will start and a grey window will appear. The window will draw a normal map in that window. After it is finished rendering the normal map the window will change to an in game window and will seem to freeze. Do not interrupt the game at this time, it’s writing the targa down to your C drive and will sometimes take quite awhile. If it looks like nothing is happening in the rendering window, don’t panic…it’s rendering out parts that you can’t see in the window. Just let it render out fully...
Rendering can take a long time: Rendering sometimes takes only seconds or nearly an hour or more to complete depending on the complexity of your model, size you are rendering out your normal, and the anti-aliasing setting you selected. Just let it render out…
Don’t open any other windows on top of the rendering window: Opening any other windows or sliding them over the top of the rendering window while your normal is rendering may cause issues. Let the engine render out the normal fully and quit out of the game before opening any other programs over the top of it.
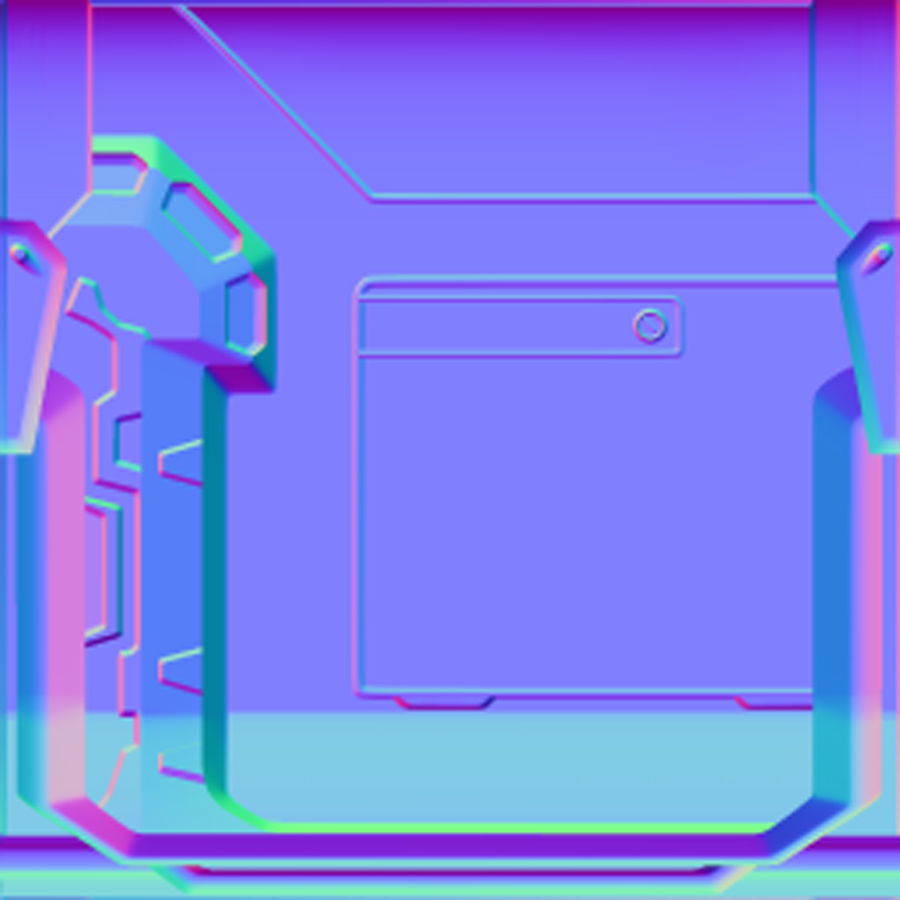
Set up the shaders to see the texture in game: At this point, you’ll need to take a look at your work. Set up temporary targas for the _d, _h, _s and put them on base with the _local in the correct directory. The renderline is not loaded into the game unless it’s called out, so leaving it there is ok. Load into ModView and see the magic. See example below:
Painting Your Diffuse, Specular, and Height Maps: After you have rendered out the normal map, you can then start painting the diffuse, specular, and height maps for your texture. Any painting program can be used to create your texture, but we at Raven use Photoshop, as do most computer and console game studios.
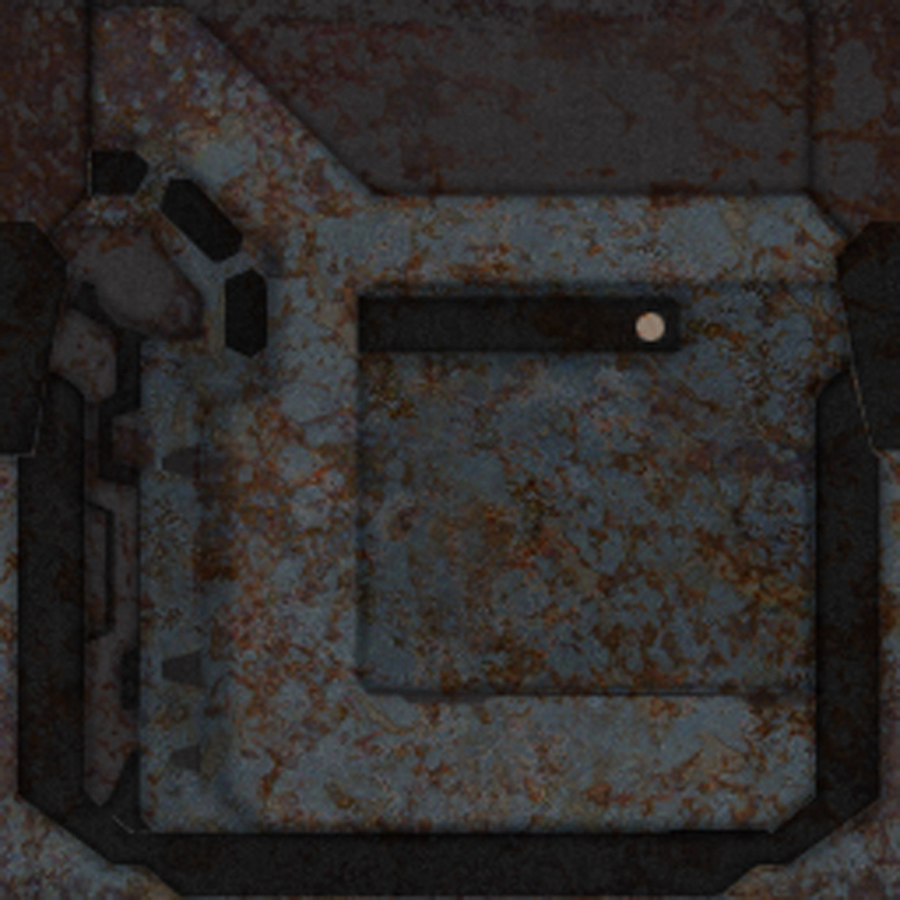
Diffuse Map: The diffuse map is the color portion of your texture. It determines the colors of the texture. Since your texture is somewhat realistic looking in the game, we recommend using photo reference for your diffuse. Photo reference are digital photos of rusty metal, different types of metals, chipped paint, rust, dirt, etc that are used to create realistic looking textures. You can use a digital camera and go out and shoot lots of real asset photos to use for your diffuse map. There is still plenty of “real” painting to do on the texture, even with using photo reference. Here’s an example:
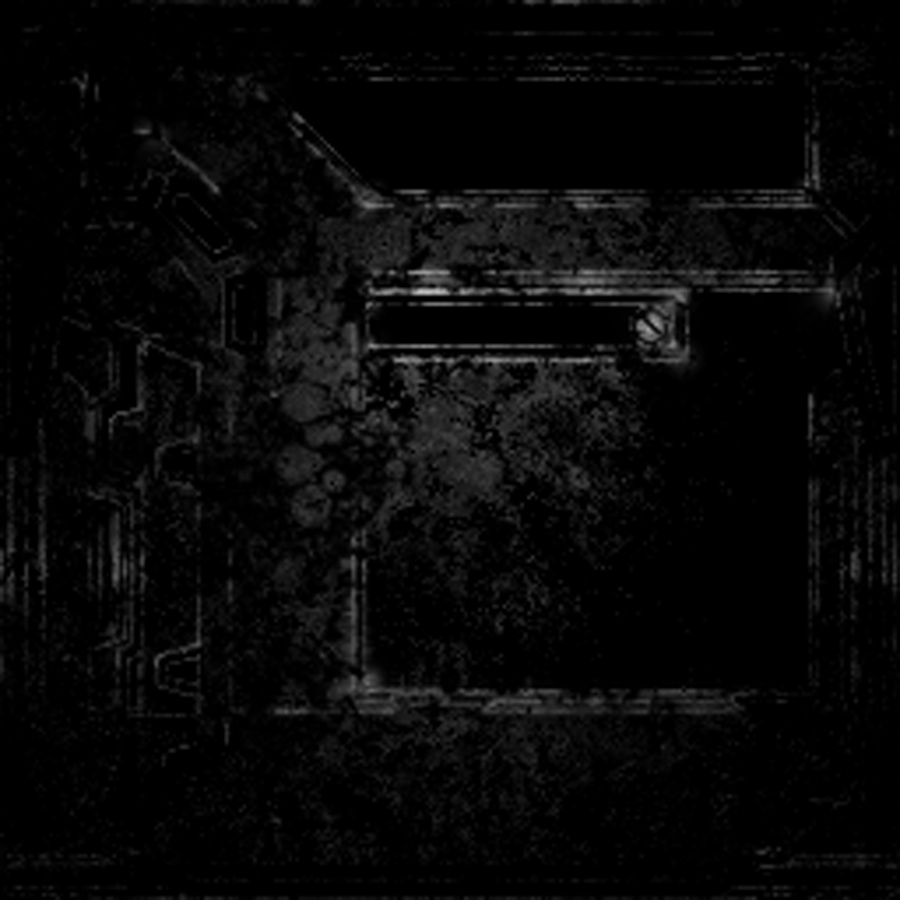
Specular Map: The specular map is used to add sheen to areas of your texture, highlights to edges, and can help determine different types of metals and define chipped paint, rust, etc. I believe the specular map is the hardest part of the texture to paint and the most time-consuming of the three maps. Do a really nice job on the specular and it’ll really make your texture really sing.
I have included a sample specular map. This will give you an idea on how to do your specular. Also, look at some of the other Q4 texture speculars to gain a better understanding and read the MAKING A SPECULAR MAP FOR QUAKE4 document. It’s very basic, but informative as to how we created specular maps for Quake4.
Tips to painting nice specular maps:
- When doing rust, rubber, and other not too reflective surfaces make those areas on your specular map the darkest areas in relation to the other more reflective parts. Rust and rubber don’t usually reflect a lot of light and therefore would be darker on your specular than some shiny metal, etc.
- You can define chrome, stainless steel, and other very reflective metals by upping the highlights or brightness on those areas of the specular.
- Adding little “hotspots” of light to highlighted edges can really help sell the realism of your texture.
- Make painted areas slightly less reflective than the metal underneath. If the metal showing though the chipped areas is a tad brighter than the painted parts, the texture will look more realistic.
- On cylinders and other rounded areas on your texture, adding a highlighted section or horizon line will make that area read much more realistically as the light rolls across/over it.
- You can add percentages of color to your specular map to intensify particular colors on your texture, etc.
If you are creating textures with blood or oil on them, you can make those look more realistic by adding an inverted color onto your specular. On your diffuse, paint your blood or oil the normal color on a layer, and then for your specular map slide a copy of the painted fluid over and invert it. In Photoshop, hit Image, then Adjustments, then Invert. That will invert the color information of your blood or oil. After being inverted, the blood will be blue green in color. You can adjust the brightness and intensity and flatten it onto your specular map. Once that is in place and saved out, the blood or oil will look so much more realistic and wet.
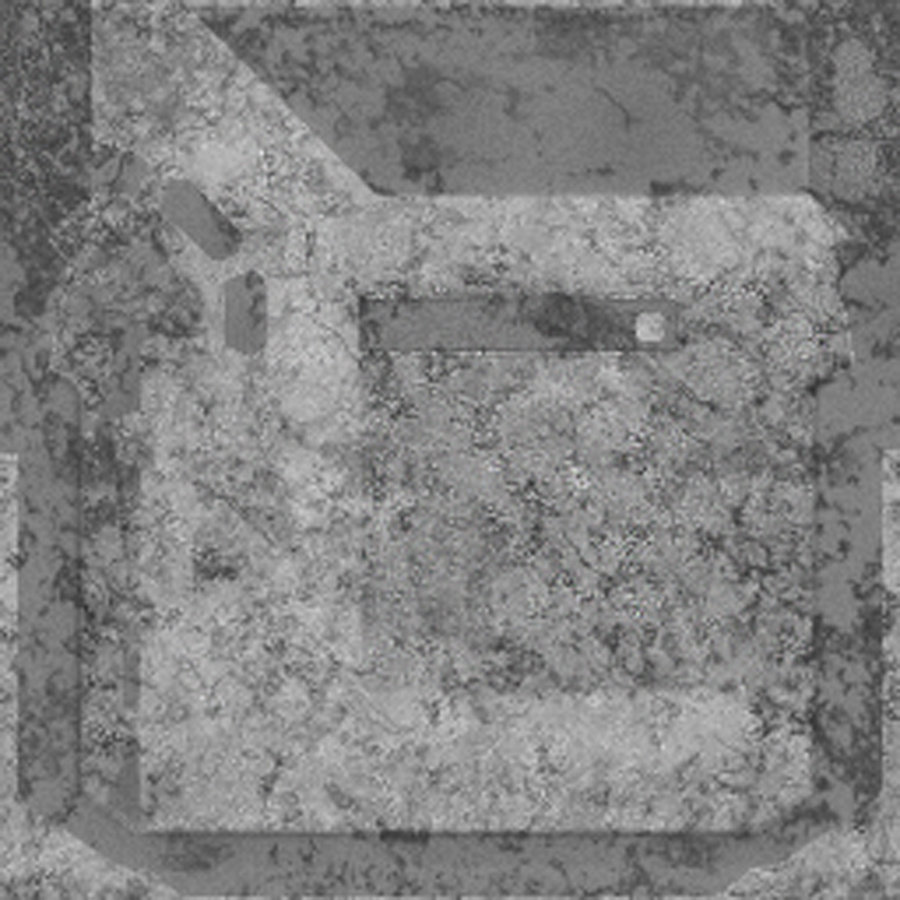
Height Map: The height map compliments the normal map. It is used to add dings, dents, scratches, indented wounds to flesh, etc. It is just a grey-scaled image. The way the height map works is that white equates to height and black equals depth. By varying the intensities of white and black, it creates differing height and depth information to the height map. The brighter or more intense the white, the greater the height indicated on your height map. The darker or more intense the black, the deeper the depth on your height map. The height map can only indicate height and depth on a 90 degree up and down angle. It can’t indicate angled information like the normal map can.
Tips to doing height maps correctly:
DO NOT just grayscale the normal map and invert it to create your height map! Doing so will only cause the height map to fight the light vectoring information of the normal and nullify its effectiveness.
- Start out your height map out with a 50% gray as its base background color. Consider 50% gray as being totally flat and anything lighter in value as being raised above it and anything darker than 50% as being lower or beneath it.
- Avoid adding tons of noise to create height. Too much noise will only muddy your height and normal maps and destroy the effectiveness of both.
- The height map doesn’t need to be overly detailed or very busy looking to do its job. It is meant to compliment the normal, not override it. If you look at the Makron’s height map, you’ll notice that it’s pretty simple. All that are on it are indications of scratches in the paint job of the Makron’s metal body parts and the flesh areas with the wounds. Notice that the veins and wrinkles on the flesh are raised with pretty intense white and that the wounds are pushed in with some very dark grays. The scratches in the metal parts of the Makron’s body are a very light gray color since paint is usually only microns thick and the scratches wouldn’t be very deep when the paint is on top of metal.
Glow Maps: You can also add glow maps to your texture. For it to work, though, you’ll need to set it up in the shader. The glow map indicates areas on the skin that glow or look like lights. The glow map usually has a 100% black as its base background and snippets of color that indicate the lights, etc. Through the shader, you can also have the glow map flicker, blink on and off, etc.
Viewing Your Texture in the LevelEditor: Once you have completed your texture, you can look at it in the game’s Editor, move lights across it, etc. This section is very basic in its description for using the LevelEditor.
To use the LevelEditor to view textures, follow these tips and guidelines:
To access the LevelEditor, open the game, bring down the console by hitting tilda (~), type the word editor, and hit enter. The LevelEditor will then open. To view your texture in the Editor it will have to have been saved out in the q4base directory.
Once the LevelEditor is open, set it up like the image below:
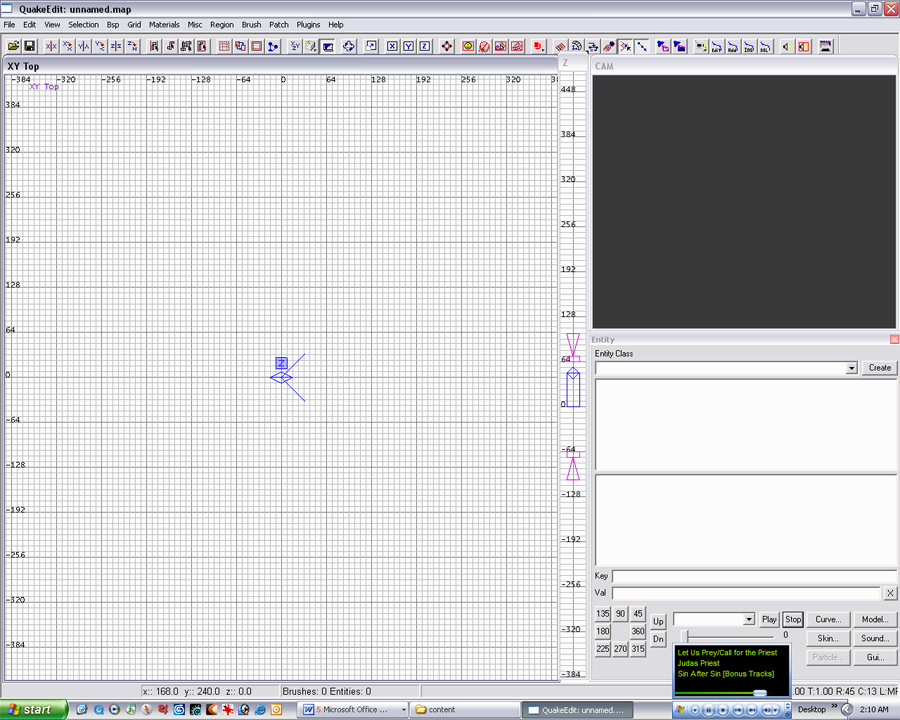
In the XY Top window create a box (A brush).
Hit Media.
Pick your texture to place on your brush (Make sure you click it open by clicking on the + only! Clicking on the word Texture will cause it to load the entire directory of textures).
Deselect the brush by hitting Shift/Left Click or Escape.
Right click in XY Top window for the Light Menu.
Create a Light (Use the Z window to move your light up and down).
Shift/Left Click to select your brush and to pull it outside.
Tools and Hot Keys for Q4Radiant
- The arrow keys move the texture around in the CAM window:
Up/Down Arrows move the texture up and down.
Right/Left Arrows rotate the texture right and left.
Shift/Left Click selects items in the windows. They turn red in color when selected.
Escape or Shift/Left Click deselects items in the windows.
Spacebar = Copy
Backspace = Delete
R turns on the rotate function to rotate an object in the XY window. Shift/Left Click on the object and pull your mouse up and down to rotate in opposing directions.
S calls up rotate and move texture texture coordinates inside the brush.
K calls up the color selector for lights.
Shift/5 orients the texture inside the brush.
A and Z orient the brush up and down in the windows.
D and C orient the brush from side to side.
F2 brings up the game in a window.
F3 to render.
F4 to render in realtime.
F5 to orient texture.
F6 for anims.
F7 to refresh lights (if needed).
Ctrl/Tab allows you to jump to different views in the XY window (top, side, front).
Insert and Delete allows you to scroll in and out in the XY window.
